Vampire Client
The Vampire Client is an expansion to the standard client, offering additional features to the chat area. This can be done temporarily through the command /client vampire or permanently by the entry Client = Vampire in the Brettspielwelt.prop file. To temporarily switch off the Vampire Client use the command /client base .
For questions and suggestions on the client there is a vampire forum for expansions.
Prerequisites
You must use the JVM Java 1.6 or later.
Warning: users of the old client automatically use version 1.4, and must either install the new version of the client, or make the following change in the Brettspielwelt.lax file:
-#LAX.NL.CURRENT.VM
----------------
-# the VM to use for the next launch
lax.nl.current.vm=jre\\bin\\java.exe
should be replaced by
-# LAX.NL.CURRENT.VM
----------------
-# the VM to use for the next launch
-#lax.nl.current.vm=jre\\bin\\java.exe
lax.nl.current.vm=C:\\Program Files\\Java\\jre1.6.0_05\\bin\\java.exe
(you may need to change the version number and the path and remove the "_")
Functionality

Chat Windows
Unlike the basic version of client, Vampire chat windows are displayed in tabs in the top of the main text window. When something new is wrintten in any window, an asterisk will show next to the name of the tab. The name of the active tab is always in bold text. The tabs can reordered manually by Drag and Drop. You can enable or disable the sound for the active channel by clicking on the speaker icon . You can also the close and leave a channel by clicking on the white 'x'. To make Tell windows behave in this manner, add the following text:
crossLeaveChan=off
This command lets you close the active channel without leaving it. Setting this variable to "on" makes you close and leave at the channel at the same time (default).
You can also navigate between tabs via the keyboard:
- Shift + arrow up -> move left one tab
- Shift + down arrow -> move right one tab
- Ctrl + arrow up -> move to left most tab
- Ctrl + down up -> move to right most tab
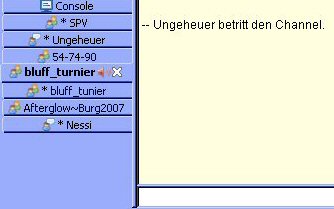
Instead of having the tabs displayed horizontally above the main window, you can have the tabs displayed vertically to the left of the main window. This is achieved using the following parameter in the prop file
placementTab = vertical
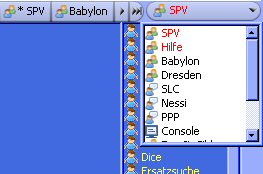
All text windows can be collected in an extra (small) window. The tab top right flashes red when there is unread chat, or a new entry in a window. One click on the tab will open that channel. Further clicks will toggle between other windows and other unread text.
Next to the tab is a small down arrow. Clicking this opens a listing of all your opened channels. Unread text will be displayed in red.
To activate this window, add the following parameter in the prop file
activeChannelListMode = on
This parameter turns the Active Channel List function on or off.
activeChannelListFirst=on
This option places the Channel List in the upper left. With "Off" it is displayed in the upper right.
Anyone present in a room (when the Console tab is selected) or the participants of a channel (if a channel is selected) will be shown in the box below. If the automatic update function does not work, use /chwho to force the update.
When the User List is used with the Console a flag denoting the Preferred Language of the player will be displayed. Names from your Bad list will be coloured red. Names from your Friends list will be coloured green. By double clicking on a name, you will open a chat window with this user. A right click on a name opens the context menu with the default functions /info, /hook and /whereis. Further commands can be added through modifying your Brettspielwelt.prop (see Configuring).
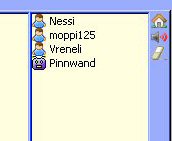
Puppets are recognizable in the channels by a specific icon.
Buttons
The three icons on the right have the following functionality:
- Click on the 'home' icon to take you directly to the manager.
- Click on the 'speaker' icon to switch sound on/off.
- Click on the 'eraser' icon to clear the content of the current window.
For details about configuring the buttons see the section below Configuration.
Smileys

Text abbreviations are automatically changed into smilies. There is also a select menu to choose a specific smiley from by clicking on it with the mouse.
DisplaySmiley = off
Disables the display of smiley in the client.
You can also configure your own smileys. The corresponding smiley image must be saved in the folder 'VampirePics'. The code should read:
SmileyMod-Smiley=Image|on/of
- Smiley: Smiley-string
- Image: the name of the image saved in the VampirePics folder
- on/off: display the smiley in the smiley window (default is on)
SmileyMod-:[=vampire.gif|off
smileyByPage=18
sets the number of visible smileys in the smiley-selection window. There may be more smileys defined than the window can show.
smileySize=25
sets the size of the smileys in the smiley-selection window (here, it is 25x25 pixels).
Pop-up Window - Login

When a user who is in your Watch list logs in to BSW , a small popup window appears for a few seconds with the image of the user's info. To disable this feature simply enter the following line in the Prop file
DisplayPopup = off
Miscellaneous
On start up, the Vampire Client can execute up to ten startup commands automatically. These must be defined in your Brettspielwelt.prop. Here's an example:
StartupCommand-1=/ctell Hi everyone
StartupCommand-2=/ctell /mode quiet=off
You can configure the Vampire to automatically log files from all channels.
autoLog=on,15
"on" activates the automatic log file generation whilst "off" disables it. You can also indicating a duration (in minutes) for the length of time to capture this text. When no time is defined, the log file is saved on closure of the window.
timestampLog=on,[yyyy_MM_dd_HH_mm]
This function adds a time/date stamp to a log file. The format for the date and time can be defined here.
folderLog=vampireLogs
Log files are stored in the "vampireLogs" directory. You can set any already created folder.
subVampProp=smiley.prop,theme.prop
You can also define various "sub-prop" files. These files will only work with the Vampire Client.
mod_scroll on/off/switch
schaltet das automatische Scrollen des Chats an/aus/andersrum
Configuration
Chatbuttons
You can also customize certain areas of the Vampire Client. For example you can configure the icons in the right sidebar. You can also configure other function buttons above the main text channels. With
toolsPosition=WEST
the Button Bar can be displayed on the left. The other possible configuration is EAST (right) and NORTH (above). The button bar may have locations when you use for the main window, the Channels or Tells.
chan_SPV_toolsPosition=NORTH
this example displays the Button Bar in the SPV-Channel
By default 2x6 icons can be displayed. This can be configured within the prop.file.
For Example
ButtonCols = 3
ButtonRows = 5
This enables 3 columns x 5 rows of icons.
Here is an example of icons on the main chat window:

Here is how you would configure you prop file:
RoomButton-1 = Manager|house.png|Open the manager|*/manager
RoomButton-2 = Sound||Sound off/on|/mod_soundSwitch
RoomButton-3 = Join|user_go.png|Join Game|/join
RoomButton-4 = Start|controller.png|Start Game|/start
RoomButton-5 = Reset|arrow_reset.png|Reset Game|/reset
#RoomButton-6 =
RoomButton-7 = Size Up|font_up.png|Enlarge Font Size|/mod_textUp
RoomButton-8 = Size Down|font_down.png|Reduce Font Size|/mod_textDown
RoomButton-9 = Clean Text|clean.png|Erase Window|/mod_textClean
#RoomButton-10 =
#RoomButton-11 =
#RoomButton-12 =
The syntax is as follows: Roombutton-X = ID|image file|Help Text|Command
- Roombutton-X: the button is displayed in the main chat. There are also ChannelButton-X and TellButton-X to configure icons in the channel and tell windows respectively. Buttons 1-6 buttons are displayed in the left-hand column, 7-12 in the right.
- ID: The button's label. The first letter of the label is displayed when no image for the button.
- image: You can elect to use any 16x16 size image, png, gif or jpg. Just save the image into the BSW\vampirePics directory.
- Command: The respective Command corresponding to the action desired. Itwill be executed in the current window. To run the command in the command window, you must precede the command with an *.
Example of a Tell Window configuration
TellButton-1 = Manager|house.png|The Manager|*/manager
TellButton-2 = Sound||Sound on/off|/mod_soundSwitch
TellButton-3 = Size Up|font_up.png|Increase Font Size|/mod_textUp
TellButton-4 = Size Down|font_down.png|Reduce Font Size|/mod_textDown
TellButton-5 = Clear|clean.png|Clear Window|/mod_textClean
Example of a Channel Window configuration
ChannelButton-1 = Manager|house.png|The Manager |*/manager
ChannelButton-2 = Sound||Sound on/off|/mod_soundSwitch
ChannelButton-3 = Size Up|font_up.png|Increase Font Size|/mod_textUp
ChannelButton-4 = Size Down|font_down.png|Reduce Font Size|/mod_textDown
ChannelButton-5 = Clear|clean.png|Clear Window|/mod_textClean
ChannelButton-6 = List|arrow_refresh.png|List Users in Channel|/chwho
For an action button, the $ can be used as a parameter. In a 'tell' window it will be replaced by the name of the user, in a channel window the principal name is used.
All buttons have dual functionality. You must first configure the normal button function then configure the Alt function.
ChannelButton-6 = Q|sound_mute.png|QuietOn|/mode quiet=on
ChannelButtonAlt-6 = Q|sound.png|QuietOff|/mode quiet=off
Oder man möchte z.B. den Chat anhalten und wieder starten:
RoomButton-1 = Scroll|scroll_lock_off.png|Scroll Lock off/on|/mod_scrollSwitch
RoomButtonAlt-1 = Scroll|scroll_lock_on.png|Scroll Lock off/on|/mod_scrollSwitch
Here button #6 will mute the channel whilst ALT with button #6 will turn the sound back on.
QuickButtons
This is a shortcut button bar configuration where you can display frequently used commands.

The bar is displayed above the input line. The keys "page up" or "page down" toggle the bar on or off. The syntax for the buttons is as follows:
RoomQuickButton-X=ID|[ImageName]|ToolTip|Aktion|Aktion
- RoomQuickButton: Creates a button via the main Console window. Channel-Quick buttons and Tell-Quick Button can also be created for the Channel and Tell windows respectively.
- X: Platznummer für den Button. Die Zahlen müssen fortlaufend sein und mit 1 beginnen.
- ID: Unverwechselbare, selbstgewählte ID für den Button.
- ImageName: Image to be used which currently resides in the Vampirepics folder.
- ToolTip: Pop-up Tooltip text for the button.
- Aktion: Befehl, der mit dem Button ausgeführt werden soll.
The button images can have a maximum height of 16 pixels and must be stored in the folder BSW\VampirePics . Some examples can be found in the Forum.
ChannelQuickButton-3 = GAME_WIZ_IMG|wizard.png|Wizardraum|*/game C198-83
In this example the third button in the toolbar displays the image "wizard.png". With one click you will be transported to the game board at C198-83
With the Quick button you can also add a sequence of commands to be executed. Here are two examples.
RoomQuickButton-1=JOIN-DOM|dominion.png|Join-Dom|*/game C31-76|*/option invisible|*/join|*/option random|*/option host|*/gameyell -Players Wanted
This example will join you to the Dominion Game in C31-76, sets the game to "invisible", "random" and "host" and sends a Gameyell with the text "Players Wanted".
ChannelQuickButton-1=CHAN-OPTION|channel.png|Channeloptionen|*/ctell /makeoper|*/ctell /chmotd Free Today!|*/ctell /mode quiet=off|*/ctell /invite Nessi|*/ctell /oper Stechmuck=+Operator|*/ctell /getmotd
This example is launched from the Channel window, opens City Chat, initiates operator, sets the Channel Moto to "Free Today!" This places in the city chat an operator sets a Channel motto that sets the channel to "quiet = off", turn quiet mode off, invites the user Nessi to the city chat, set Stechmuck as an additional operator and then retrieve the motto for the channel.
When creating channel commands, make sure to prefix before every command channel the channel name and the (*/ctell or */channel gtell) command.
Context Menu
In the main window you'll find the following functionality (right click on text):
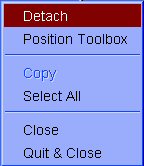
- Detach/Attach: allows you to attach or detach tell/channel windows from the main client.
- ToolBox position: This allows you to move the Toolbox buttons from right, above and left.
- Copy: Copies highlighted text to the clipboard.
- Select All: Selects all text in the window.
- Close: Closes the Text window.
- Quit & Close: This not only closes the channel, it also removes you from the channel.
You can modify the default menu to your own specification. The Console, channel or tell windows can be done individually. Place the following line(s) in your Brettspielwelt.prop.
ContextMenuTellMod = Add to your 'Tell' windows
ContextMenuTellMod-Goto = */ghook $
ContextMenuChanMod = Add to your 'Channel' windows
ContextMenuChanMod-Leave = */leave $
ContextMenuRoomMod = Add to your 'Console' window
ContextMenuRoomMod-Leave = */who
Caution When you add at least one entry in the ContextMenuTellMod, you overwrite the default setting.
Appearance
The button colour can also be configured independently.
- button_bgCol: Standard button colour.
- button_rollCol: Button Colour when mouse is moved across.
- button_pressCol: colour of a button when selected (active).
button_pressCol=FF0000
This would show a red button when activated.
The coloured button can also be shown with a horizontal transition between 2 colours:
button_bgCol=000000,FFFFFFF
This is a standard button with black to white transition.

If you have to many text windows open, some tabs are no longer visible. You will be able to navigate via the black arrows on the left and right of the tabs. The double arrows will move you to the very left or right of your tabs. If you like to have many tabs open and don't want to keep scrolling through them then you can modify your Brettspielwelt.prop so that all your tabs are displayed on several rows.
scrollTab = off
By default, all the tabs are arranged in order that they were opened. You can set the order of the tabs via drag & drop. If you set the parameter AutoSave = on in the prop file, the tab order is automatically saved. Alternatively, you can directly use the command /mod_save in the command line.
You can switch off the fixed tabs functionality. This looks more like the standard client, where the channels and tells are placed directly under the console tab. This is done by placing the following parameter in the prop file.
fixedTab = off
roundTabEnable=on
This option displays rounded tabs instead of the standard rectangular tabs.
The colour of the Tabs can also be modified to your own taste. The settings for this aresimilar to adjusting the colour of the tabs in your text windows (see below).
- chan_tab_bgCol=Hexfarbe1,Hexfarbe2: Ändert die Hintergrundfarbe aller Channeltabs (mit Farbverlauf).
- chan_tab_fgCol = Hexadecimal: Changes the font color of all Channel tabs.
- chan_Channelname_tab_bgCol=Hexfarbe1,Hexfarbe2: Ändert die Hintergrundfarbe eines bestimmen Channeltabs (mit Farbverlauf).
- chan_Channelname_tab_fgCol=Hexfarbe1,Hexfarbe2: Ändert die Schriftfarbe eines bestimmten Channeltabs.
- tell_tab_bgCol=Hexadecimal1, Hexadecimal2: Changes the background color of all Tell tabs (with transition).
- tell_tab_fgCol=Hexadecimal: Changes the font color of all Tell tabs.
tab_selCol=Hexfarbe1,Hexfarbe2
Configuring the color of a selected tab.
Maybe if you want a change, you can generate Tab colours randomly :
rnd_bgTab=on
This setting makes sets the tab background colour randomly. Set this to "off" to suppress this functionality.
As well as modifying colours in the Brettspielwelt.prop , the Vampire can modify any chat window into a particular color . Use the following code:
chan_Channelname_Propeintrag = Hexidecimal Value
- chan_ or tell_: Name of the channel or Tell window
- Propeintrag: corresponding parameter file Brettspielwelt.prop. eg. (bgcol) for the background colour.
chan_SPV_bgCol = FFFFFF
would change the background color of the SPV channels.
tell_Stechmuck_fgSize = 16
The would change the font size in the Tell window with Stechmuck.
Even the main window background colour can be changed. Use the following code:
bgVamp=Hex Colour 1,Hex Colour 2,Filename ,Picture Mode
- Using Hex Colours 1 + 2: Transition of WEB Colours 1 and 2
- Filename: A background image can be added (located in the folder vampirePics).
- Picture Mode: Specifies the location of the inserted image in (c = centered, m = mosaic, s = stretched).
main_bgVamp=000000,FFFFFF
Sets up a transition from black to white for the main chat window. It can also be applied to the channel windows and the chat windows.
- cchan_bgVamp= Hex Colour 1, Hex Colour 2
- tell_bgVamp= Hex Colour 1, Hex Colour 2
It is here also possible to modify specific windows, channel windows or Chat Windows. To do this simply use
- chan_Channelname_bgVamp=Hex Colour 1,Hex Colour 2,Filename ,Picture Mode
- tell_Tellname_bgVamp=Hex Colour 1,Hex Colour 2,Filename ,Picture Mode

To display this background for the "taom" Channel use the following setting:
chan_taom_bgVamp=32CD32,FFFFFF,taomBgpic.png,c
Also it is possible to display a background image according to the gameroom of the city where you are. The code to do this is:
gameBackground=Hex Colour1,Hex Colour2,Font Colour,Image file name, Image Mode
- Using Hex Colours 1 + 2: Transition of WEB Colours 1 and 2
- Font color: Hex Colour for text for writing.
- Image File Name: You can Use Game Names (spelt the same as in the Lobby) and City locations (Cxx-yy). The '$' defines the name of the city or the game, where you are currently, provided images are stored in the 'vampirePics' folder.
Example: $gameBoard.png is replaced by DominionBoard.png if you are playing Dominion. If you are in town C198, then the image C198Board.png would be selected.
- Picture Mode: Specifies the location of the inserted image in (c = centered, m = mosaic, s = stretched).
For a game room or a specific city you can also configure a defined background which overwrites the command "gameBackground =...".
GameName_bgVampGame=Hex Colour1,Hex Colour2,FileImage,PcitureMode
Example:
gameBackground=,,,$gameBoard.png,s
loads a stretched version of the corresponding image of the game you are playing without changing the colours.
C198_bgVampGame=00C000,FFFFFF
No image loaded, however a transition colour from Green to White when you are in City C198.
Dominion_bgVampGame=,,FFFFFF
Displays a white background in Dominion Gamerooms.
System messages can also be changed to other colours:
sysStyle = FontColour, Background Colour, Style
The styles avaiilable are (i)talic, (b)old, (u)nderline, (s)trikethrough and (n)ormal and can be a composite of these styles.
]sysStyle=000000,FFFFFFF,i
System messages set to black italic text on a white background.
Instead of sysStyle you can use the commands chan_NomCanal_sysStyle or tell_nomUser_sysStyle to modify text on the channel or chat windows.
Keyword Colours
By using keywords you can display certain words in a specific colour.
keywordVamp-ID=Schlüsselwort,isRegEx,Schriftfarbe,Hintergrundfarbe,Stil
- ID = Numbers (1-100).
- Keyword = keyword to change colour of.
- isRegEx = "true" setzen, wenn das Schlüsselwort ein regulärer Ausdruck (Regular Expression) ist, andernfalls "false" setzen.
- Font color, background color = any Hex Colour.
- Style = see 'System Messages' section
keywordVamp-1=test,false,FF0000,,ib
If the text "test" is found, make red italic bold.
vampireSearch = 0
You can run the keywords search in two modes. (1) character by character (1) and (0) word by word (0). If Mode(0) is elected then exact word matches are modified. If set to Mode(1) then text strings are modified even if they exist within other words.
In the previous example, by setting 0, the word "test" would be entirely colored by setting 1 only the four characters "test" are colored within any word.
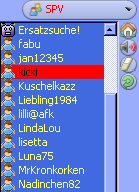
You can also highlight certain names in the User List with a coloured highlight.
- chan_listSel_fgCol = Hexadezimalwert: Changes the font color of a name in the user list of a channel.
- chan_listSel_bgCol = Hexadezimalwert: Changes the background color of a user name in the list of a channel.
chan_listSel_bgCol=FF0000
chan_listSel_fgCol=000000
This example makes the selected name in the user list of a channel have a red background and black font.
chan_[SPV]_listSel_fgCol=FF0000
This example makes the selected name in the user list of the SPV channel to have a red background and black font.
You can replace the prefix chan_ with tell_ to use the same functionality with tell windows.
To define a particular colour to text written by an individual, right click on the user's name from the Users list and click on the user's name from that sub-menu.
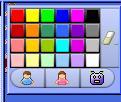
This will create a popup window selection, where you can choose the font colour. You can also associate an icon with each user (man, woman or puppet). Select the eraser icon on the right to remove changes.
Sounds
You can also set your own sound file to execute with the Channel and Tell Windows (whenever new text is displayed).
chan_snd_txt=mysound.wav
Here the sound file "mysound.wav" will be played in all channel windows as soon as new text is displayed.
chan_SPV_snd_txt=mySPVsound.wav
Here the Sound file "mySPVsound.wav" will play only in the SPV channel.
tell_snd_txt=tellsound.wav
Here the sound file "tellsound.wav" is used by all Tell Windows.
For sound you must use *.wav or *.au format and save them in the "vampirePics/sounds" folder in the BSW dircetory.
Caution! In all settings modifying channels or Tell windows: Use the "+" instead of the "=" !
